Patterns in Role Based Access Control (RBAC)
RBAC is an effective way to manage user permissions by grouping them together into roles. This general principle is what ties together the different RBAC patterns below. Where they differ is the granularity at which the roles are applied.
Multi-tenancy (Organization-level Roles)
Coarse grained access control
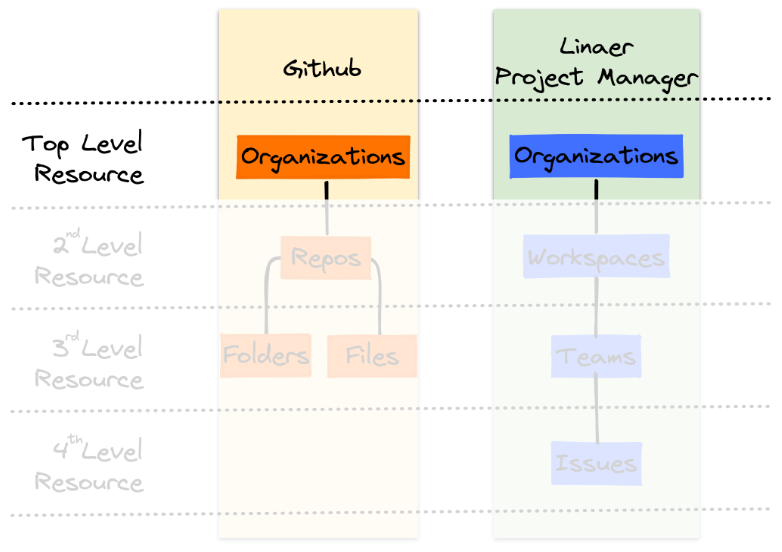
In this pattern, roles given within an organization, or whatever resource represents the top level of your resource structure. Access is restricted to users that have roles within your top level resource. Access is not shared between resources.

The image above provides two example applications: Github and Linear (a project management system). In both > applications, organizations represent the top level resource found.
Get Started with Multi-tenancy
Action Items
Once you have collected the information listed above, add this pattern to your policy. You can use the example below to get started. Steps are listed in the comments.
actor User {}# 1. Define your top-level resource. If needed, you can replace the# name "Organization" with something more relevant to your app.resource Organization { # 2. List all the permissions you identified here: permissions = [ <FIRST_PERMISSION>, <SECOND_PERMISSION> ... ]; # 3. List all the roles you identified here: roles = [ <FIRST_ROLE>, <SECOND_ROLE> ... ]; # 4. Write rules that specify the permissions each role has. <FIRST_PERMISSION> if <FIRST_ROLE>; <FIRST_PERMISSION> if <SECOND_ROLE>; <SECOND_PERMISSION> if <SECOND_ROLE>; ...}
NOTE: A
has_rolerule is automatically defined whenever permissions are assigned to roles within a resource block (as we have done here). Although it is not visible in the policy, you can usehas_rolewhen writing facts for Oso Cloud.
Next Steps
Resource-specific Roles
Fine grained access control
Going beyond the top level of your app leads into more granular resources. However, before adding these patterns, you'll want to make sure authorization is working at the organization level first.
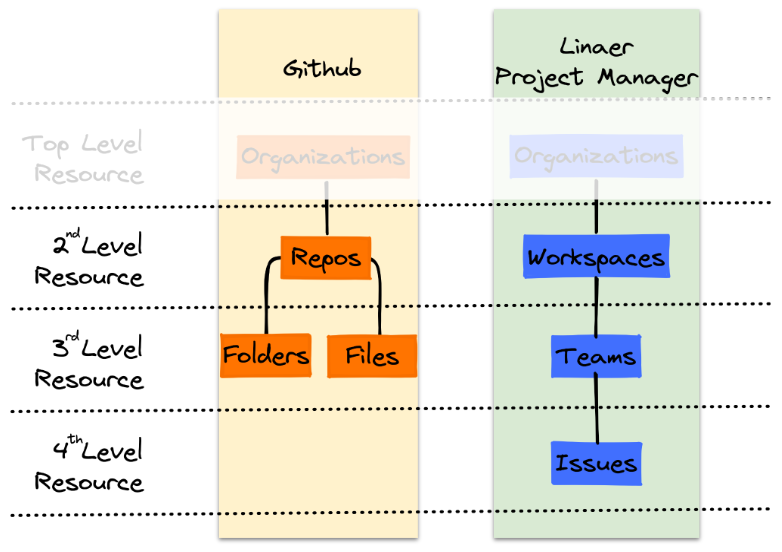
Taking the same examples shown in the multi-tenancy pattern, we now focus on the levels below organizations.

Using Github and Linear (a project management system) as examples, we've listed resources the applications use. The > resources that fall under the top level help model the app with finer granularity. Each of > these additional resources must also be described in terms of the roles and permissions that accompany them.
When creating resource specific authorization, you'll apply a nearly identical process to what is discussed in Multi-tenancy(identifying the resources, roles, ect.). One key difference is that relationships start to play a part in how the individual resources connect to the wider application. We'll address that topic in the next section Patterns in Relationship Based Access Control. For now, it's enough to focus simply on granting access to those resources based on the roles and permissions within.
Get Started with Resource-specific Roles
Action Items
Once you have collected the information listed above, you can add this pattern to your policy. You can use the example below to get started. Steps are listed in the comments.
actor User {}# Top level resource already defined.resource Organization { ...}# 1. Define additional resource by adding new resource blocksresource <RESOURCE_0> { # 2. List all the permissions you identified here: permissions = [ <FIRST_PERMISSION>, <SECOND_PERMISSION> ... ]; # 3. List all the roles you identified here: roles = [ <FIRST_ROLE>, <SECOND_ROLE> ... ]; # 4. Write rules that specify the permissions each role has. <FIRST_PERMISSION> if <FIRST_ROLE>; <FIRST_PERMISSION> if <SECOND_ROLE>; <SECOND_PERMISSION> if <SECOND_ROLE>; ...}...#Additional resourcesresource <RESOURCE_N> { ...}
Next Steps
Additional Resources
Talk to an Oso Engineer
If you'd like to learn more about using Oso Cloud in your app or have any questions about this guide, connect with us on Slack. We're happy to help.